CodeIgniter/MySQL Tutorial - Read and Display data with Twitter Bootstrap
CodeIgniter is the simplest and light PHP framework which lets you create robust web applications in no time. Using Twitter Bootstrap with CodeIgniter saves the hassle of writing CSS Stylesheets for your app and lets you focus on development. Later you can customize bootstrap styles to suit your need. That is the best part of using MVC pattern as the presentation (view) is separate, you can change the look and feel of the app anytime without disturbing the rest of it. kodingmadesimple.com have good amount of twitter bootstrap tutorials about customizing bootstrap 3 and I recommend you to go through our bootstrap tutorials section.
Now we'll see how to read data from MySQL Database and display it in a neat table format with Bootstrap. Since we are going to use bootstrap we don't want to write any custom stylesheets for formatting the display. If you are not familiar with using Bootstrap with CodeIgniter, then you must read this tutorial on How to integrate Bootstrap with CodeIgniter.
In this CodeIgniter tutorial, I'm going to read data from the MySQL database and display it in a neat table format using Bootstrap3. For example assume we have a DB called employee which has the below two tables.
tbl_dept (int_id | var_dept_name | int_hod)
tbl_emp (int_id | var_emp_name | int_dept_id)
tbl_emp (int_id | var_emp_name | int_dept_id)
Now I want to display the entire department list along with the head-of-department employee name.
1. First create the model with name department_model.php in the foldersystem/application/models. Then add a function to read the department list from the DB.
department_model.php<?php if ( ! defined('BASEPATH')) exit('No direct script access allowed'); class department_model extends CI_Model{ function __construct() { // Call the Model constructor parent::__construct(); } //read the department list from db function get_department_list() { $sql = 'select var_dept_name, var_emp_name from tbl_dept, tbl_emp where tbl_dept.int_hod = tbl_emp.int_id'; $query = $this->db->query($sql); $result = $query->result(); return $result; } }
2. Next create the controller file with name department.php in the foldersystem/application/controllers. In this controller call the model function to get the department list and pass it to the view file for presentation.
department.php<?php if ( ! defined('BASEPATH')) exit('No direct script access allowed'); class department extends CI_Controller { public function __construct() { parent::__construct(); $this->load->helper('url'); $this->load->database(); } public function index() { //load the department_model $this->load->model('department_model'); //call the model function to get the department data $deptresult = $this->department_model->get_department_list(); $data['deptlist'] = $deptresult; //load the department_view $this->load->view('department_view',$data); } }
3. Finally create the view file with name department_view.php in the foldersystem/application/views. Now parse the data received from the controller one by one and display it. In order to display the department lists in a neat table format use the bootstrap built-in classes table, table-striped & table-hover.
department_view.php<html> <head> <title>Department Master</title> <meta name="viewport" content="width=device-width, initial-scale=1.0"> <!--link the bootstrap css file--> <link rel="stylesheet" href="<?php echo base_url("assets/css/bootstrap.css"); ?>"> </head> <body> <div class="container"> <div class="row"> <div class="col-lg-12 col-sm-12"> <table class="table table-striped table-hover"> <thead> <tr> <th>#</th> <th>Department Name</th> <th>Head of Department</th> </tr> </thead> <tbody> <?php for ($i = 0; $i < count($deptlist); ++$i) { ?> <tr> <td><?php echo ($i+1); ?></td> <td><?php echo $deptlist[$i]->var_dept_name; ?></td> <td><?php echo $deptlist[$i]->var_emp_name; ?></td> </tr> <?php } ?> </tbody> </table> </div> </div> </div> </body> </html>
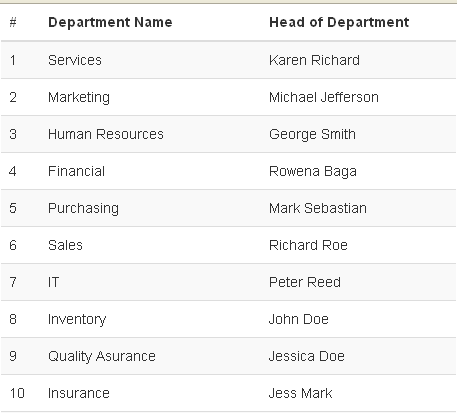
Here is the table view of the above example

As I've said earlier in this tutorial we haven't written any CSS styles of our own, yet we get a neatly formatted table list by using bootstrap classes (Nice isn't it?).
This CodeIgniter/MySQL Host Genics tutorial teaches you how to read and display data using Twitter Bootstrap for a responsive and visually appealing web interface.
ReplyDelete