How to Create Simple Registration Form in CodeIgniter with Email Verification
Hi, I have been writing codeigniter tutorials series for quite some time and already discussed about creating login form and contact form in codeigniter and bootstrap. One of the primitive features of any membership website is user registration system. Obviously the common trait of a signup form is to ask for too many details which will scare away users from your site. But keeping the form as minimal as possible will encourage them to sign up easily. Having said that today I’m going to show you, how to create a simple and elegant registration form in codeigniter along with email verification procedure.

Two-Step User Registration System with Email Verification
The codeigniter registration system we are going to build is a two step registration process namely 1. user registration and 2. user authentication process. It’s common now-a-days to send a confirmation link to user’s email-id during signup and activating the user’s account only when he/she confirms the email id they have provided at the time of registration. By this way we can keep away the spammers and attract only the serious users interested in the value provided by your site.
Flow for User Registration System
Here goes the flow for our user registration module.
- Ask user to fill in the basic details with email id in the registration form.
- Once validating the user submitted details, insert user data into database.
- Create a unique hash key and send a confirmation link to the user’s email id.
- User clicks on the confirmation link and return back to site.
- Verify the hash key within the link and activate the user’s account.
Creating Registration Form in CodeIgniter with Email Verification
Now we’ll move on to implement the above registration procedure in codeigniter. Beforehand, we’ll create mysql database required to store the user’s details.
Create MySQL Database for User Registration
First create a database named ‘mysite’ and run the below sql command to create the‘user’ table to save data.
SET SQL_MODE="NO_AUTO_VALUE_ON_ZERO";

CREATE TABLE IF NOT EXISTS `user` (
  `id` int(12) NOT NULL AUTO_INCREMENT,
  `fname` varchar(30) NOT NULL,
  `lname` varchar(30) NOT NULL,
  `email` varchar(60) NOT NULL,
  `password` varchar(40) NOT NULL,
  `status` bit(1) NOT NULL DEFAULT b’0’,
  PRIMARY KEY (`id`)
) ENGINE=MyISAM  DEFAULT CHARSET=latin1 AUTO_INCREMENT=1 ;
The
status field is set by default to ‘0’ indicating the deactivate state of the user, and it will be set to ‘1’ for activating the user account once we confirm the email id.
Next we’ll move on to creating required codeigniter files for this registration module.
The Model (‘user_model.php’)
Create a model file named ‘user_model.php’ inside ‘application/models’ folder. Then copy paste the below code to the file.
<?php
class user_model extends CI_Model
{
    function __construct()
    {
        // Call the Model constructor
        parent::__construct();
    }

    //insert into user table
    function insertUser($data)
    {
        return $this->db->insert('user', $data);
    }

    //send verification email to user's email id
    function sendEmail($to_email)
    {
        $from_email = 'team@mydomain.com'; //change this to yours
        $subject = 'Verify Your Email Address';
        $message = 'Dear User,<br /><br />Please click on the below activation link to verify your email address.<br /><br /> http://www.mydomain.com/user/verify/' . md5($to_email) . '<br /><br /><br />Thanks<br />Mydomain Team';

        //configure email settings
        $config['protocol'] = 'smtp';
        $config['smtp_host'] = 'ssl://smtp.mydomain.com'; //smtp host name
        $config['smtp_port'] = '465'; //smtp port number
        $config['smtp_user'] = $from_email;
        $config['smtp_pass'] = '********'; //$from_email password
        $config['mailtype'] = 'html';
        $config['charset'] = 'iso-8859-1';
        $config['wordwrap'] = TRUE;
        $config['newline'] = "\r\n"; //use double quotes
        $this->email->initialize($config);

        //send mail
        $this->email->from($from_email, 'Mydomain');
        $this->email->to($to_email);
        $this->email->subject($subject);
        $this->email->message($message);
        return $this->email->send();
    }

    //activate user account
    function verifyEmailID($key)
    {
        $data = array('status' => 1);
        $this->db->where('md5(email)', $key);
        return $this->db->update('user', $data);
    }
}
?>
This model file takes care of all the background communication and we have created three functions,
1.
insertUser() to save the form data into database provided by user.
2.
sendEmail() to send verification email to the user’s email id provided at the time of registration. Here we generate a unique hash key with the user’s email-id and attach it with a link and mail it to the user. Read this tutorial on sending email in codeigniter using smtp to learn more about configuring email settings.
3.
verifyEmailID() to activate the user account after confirming the hash key from the earlier generated link. Here we update the status field from ‘0’ to ‘1’ representing the active state of the account.
Note: The above mentioned active state of the user will be used during user login process. Check this codeigniter login tutorial to see it in action.
The Controller (‘user.php’)
Next create a controller file named ‘user.php’ inside ‘application/controllers’ folder. And copy paste the below code to it.
<?php
class user extends CI_Controller
{
    public function __construct()
    {
        parent::__construct();
        $this->load->helper(array('form','url'));
        $this->load->library(array('session', 'form_validation', 'email'));
        $this->load->database();
        $this->load->model('user_model');
    }

    function index()
    {
        $this->register();
    }

    function register()
    {
        //set validation rules
        $this->form_validation->set_rules('fname', 'First Name', 'trim|required|alpha|min_length[3]|max_length[30]|xss_clean');
        $this->form_validation->set_rules('lname', 'Last Name', 'trim|required|alpha|min_length[3]|max_length[30]|xss_clean');
        $this->form_validation->set_rules('email', 'Email ID', 'trim|required|valid_email|is_unique[user.email]');
        $this->form_validation->set_rules('password', 'Password', 'trim|required|md5');
        $this->form_validation->set_rules('cpassword', 'Confirm Password', 'trim|required|matches[password]|md5');

        //validate form input
        if ($this->form_validation->run() == FALSE)
        {
            // fails
            $this->load->view('user_registration_view');
        }
        else
        {
            //insert the user registration details into database
            $data = array(
                'fname' => $this->input->post('fname'),
                'lname' => $this->input->post('lname'),
                'email' => $this->input->post('email'),
                'password' => $this->input->post('password')
            );

            // insert form data into database
            if ($this->user_model->insertUser($data))
            {
                // send email
                if ($this->user_model->sendEmail($this->input->post('email')))
                {
                    // successfully sent mail
                    $this->session->set_flashdata('msg','<div class="alert alert-success text-center">You are Successfully Registered! Please confirm the mail sent to your Email-ID!!!</div>');
                    redirect('user/register');
                }
                else
                {
                    // error
                    $this->session->set_flashdata('msg','<div class="alert alert-danger text-center">Oops! Error.  Please try again later!!!</div>');
                    redirect('user/register');
                }
            }
            else
            {
                // error
                $this->session->set_flashdata('msg','<div class="alert alert-danger text-center">Oops! Error.  Please try again later!!!</div>');
                redirect('user/register');
            }
        }
    }

    function verify($hash=NULL)
    {
        if ($this->user_model->verifyEmailID($hash))
        {
            $this->session->set_flashdata('verify_msg','<div class="alert alert-success text-center">Your Email Address is successfully verified! Please login to access your account!</div>');
            redirect('user/register');
        }
        else
        {
            $this->session->set_flashdata('verify_msg','<div class="alert alert-danger text-center">Sorry! There is error verifying your Email Address!</div>');
            redirect('user/register');
        }
    }
}
?>
In the controller file we have created two functions namely,
register() for the first step of the registration process and verify() for authenticating the user.CodeIgniter Registration Form Validation
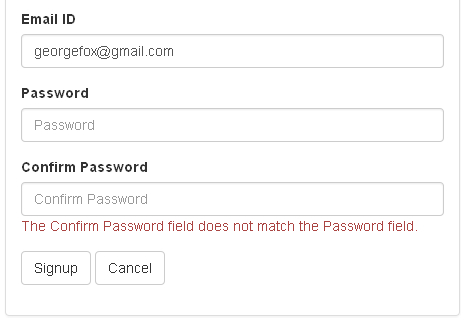
In the register() method, we asks the user to fill in the details, submit it and validate the form data. As I have said earlier, we have a signup form with minimal fields for
first name, last name, email-id and password. It’s a good practice to ask the user to re-enter the password once again and we confirm if both the passwords match or not. If there is any mismatch we notify the user with an error message like this.
We also confirm if the email-id provided by user is unique and not used already for another account. Codeigniter provides a simple way to confirm this with the built-in validation function
is_unique[user.email] where ‘user’ is the database table name and ‘email’ is the database column name to check out.
Once we validate the user details and confirm everything is ok, we insert the data into database with the line
$this->user_model->insertUser($data). And send the mail to user’s email-id using $this->user_model->sendEmail($this->input->post('email')).
For generating the hash key, I have
md5() ‘ed the user’s email-id and sent it with the confirmation link. By this way, we don’t have to store a separate hash key in the database for each user. However you can generate a random hash and store in the database for later verification. It’s up to you.
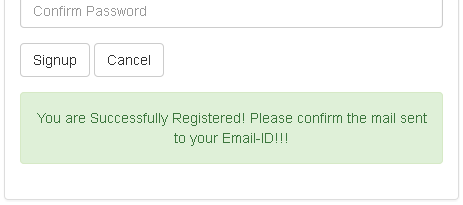
After successfully sending the email, we notify the user to confirm their email-id to complete the registration process like this.

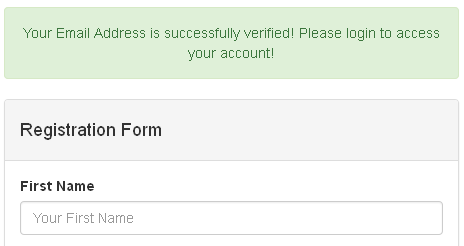
Later when the user clicks on the email link, they will be taken back to the site and to the verify() function in the controller. The hash code will be tested against the email id stored in the database and that particular user account will be activated and will be promptly notified like this.

The View (‘user_registration_view.php’)
We have created model and controller file for user registration. Now it’s time to build user interface i.e., registration form with all the required form fields. For that create a view file named ‘user_registration_view.php’ inside ‘application/views’ folder and copy paste the below code to it.
<!DOCTYPE html>
<html>
<head>
    <meta name="viewport" content="width=device-width, initial-scale=1.0">
    <title>CodeIgniter User Registration Form Demo</title>
    <link href="<?php echo base_url("bootstrap/css/bootstrap.css"); ?>" rel="stylesheet" type="text/css" />
</head>
<body>
<div class="container">
<div class="row">
    <div class="col-md-6 col-md-offset-3">
        <?php echo $this->session->flashdata('verify_msg'); ?>
    </div>
</div>

<div class="row">
    <div class="col-md-6 col-md-offset-3">
        <div class="panel panel-default">
            <div class="panel-heading">
                <h4>User Registration Form</h4>
            </div>
            <div class="panel-body">
                <?php $attributes = array("name" => "registrationform");
                echo form_open("user/register", $attributes);?>
                <div class="form-group">
                    <label for="name">First Name</label>
                    <input class="form-control" name="fname" placeholder="Your First Name" type="text" value="<?php echo set_value('fname'); ?>" />
                    <span class="text-danger"><?php echo form_error('fname'); ?></span>
                </div>

                <div class="form-group">
                    <label for="name">Last Name</label>
                    <input class="form-control" name="lname" placeholder="Last Name" type="text" value="<?php echo set_value('lname'); ?>" />
                    <span class="text-danger"><?php echo form_error('lname'); ?></span>
                </div>

                <div class="form-group">
                    <label for="email">Email ID</label>
                    <input class="form-control" name="email" placeholder="Email-ID" type="text" value="<?php echo set_value('email'); ?>" />
                    <span class="text-danger"><?php echo form_error('email'); ?></span>
                </div>

                <div class="form-group">
                    <label for="subject">Password</label>
                    <input class="form-control" name="password" placeholder="Password" type="password" />
                    <span class="text-danger"><?php echo form_error('password'); ?></span>
                </div>

                <div class="form-group">
                    <label for="subject">Confirm Password</label>
                    <input class="form-control" name="cpassword" placeholder="Confirm Password" type="password" />
                    <span class="text-danger"><?php echo form_error('cpassword'); ?></span>
                </div>

                <div class="form-group">
                    <button name="submit" type="submit" class="btn btn-default">Signup</button>
                    <button name="cancel" type="reset" class="btn btn-default">Cancel</button>
                </div>
                <?php echo form_close(); ?>
                <?php echo $this->session->flashdata('msg'); ?>
            </div>
        </div>
    </div>
</div>
</div>
</body>
</html>
Note: As for the style sheet I used twitter bootstrap css, but feel free to use your own if you prefer.
Recommended Read: Quick Guide to Integrate Twitter Bootstrap CSS with CodeIgniter
The above view file produces a minimal and elegant registration form like this.

As you can see in the view file, I have used several css styles (‘class’) to quickly design this form and those are Bootstrap’s build-in form classes. To display the form validation errors, I have used codeigniter’s
form_error() function below the corresponding form input fields.
Also the line
$this->session->flashdata(); is used to notify success/failure message after registration process. Unlike simple echoed messages, the flashdata message will be displayed only once after the redirection takes place.
And that was all about creating user registration form in codeigniter with email verification. I hope this two step registration system will be helpful to you. If you have any trouble implementing it, please voice it through your comments.
No comments:
Post a Comment